Understanding the Node.js Event Loop: Single‑Thread, Maximum Throughput
If you’ve spent any time with Node.js, you’ve probably heard that “Node uses an event loop” and that this is why it can scale well. But what is the event loop really doing under the hood, and how does a single‑threaded runtime handle thousands of concurrent requests without freezing?
In this post, we’ll walk through the Node.js event loop at a high level: what it is, why Node.js needs it, how async operations are handled, and how it contributes to scalability—all without touching C‑level implementation details.
What the Event Loop Is
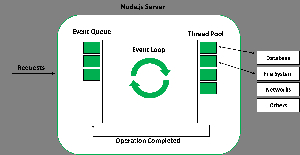
At a high level, the event loop is the mechanism that continuously checks “what needs to be done next” and runs the appropriate callbacks. In Node.js, it sits between the JavaScript engine and the underlying system (file system, network, timers, etc.) and orchestrates how your code runs over time instead of all at once.
Think of your server as a single‑threaded worker that never blocks the main thread. The event loop is the scheduler that queues and dispatches tasks so that the worker always has something useful to do while waiting for I/O to finish.
Why Node.js Needs an Event Loop
Node.js is built on a single‑threaded JavaScript runtime, meaning the main thread can execute only one piece of JavaScript at a time. If every file read, database call, or HTTP request were synchronous, the server would freeze while waiting, and it could only handle one request at a time.
The event loop solves this by:
Offloading slow operations (like disk and network) to the operating system or a small thread pool (via
libuv).Queuing their callbacks and calling them later when the work is done.
This lets Node.js appear “concurrent” even though the main JS thread is single‑threaded, which is why it can handle thousands of connections efficiently.
The Single‑Thread Limitation and the “Task Manager” Analogy
To understand why the event loop is needed, imagine a bakery with only one worker (the main thread). When a customer orders a cake, the worker can’t just stand there for 30 minutes waiting for it to bake; instead, they:
Put the order in the oven (OS / I/O).
Move on to help other customers.
Check periodically if cakes are ready and then hand them out.
In code terms:
The main thread is the worker.
The event loop is the clerk checking the oven log and dispatching “done” orders.
Without this scheme the bakery would be stuck on one order; that’s the single‑thread limitation Node.js avoids via the event loop.
Task Queue vs Call Stack (Conceptual)
Inside the JavaScript engine, two core ideas interact with the event loop:
Call stack: A stack of currently executing functions. Code runs from top to bottom, and when a function finishes, it pops off.
Task queue (callback queue): A line of callbacks waiting for the call stack to clear so they can be pushed onto the stack and run.
A simple analogy:
You’re at a public office.
The counter window is the call stack: only one person can be served at a time.
The waiting line is the task queue: everyone must wait their turn until the counter is free.
When an async operation (like setTimeout or reading a file) finishes, its callback is added to the queue. The event loop then pulls the next callback from the queue onto the call stack whenever the stack is empty.
How Async Operations Are Handled
Asynchronous operations in Node.js follow this pattern:
You start an async operation (e.g.,
fs.readFile,setTimeout, HTTP request).Node delegates the heavy work to the OS or a small thread pool and remembers the callback you passed.
The main thread continues with other code (non‑blocking).
When the operation finishes, the callback is queued.
The event loop eventually picks the callback from the queue and runs it on the call stack.
For example:
console.log("1");
setTimeout(() => console.log("2"), 0);
console.log("3");
You’ll see 1 → 3 → 2 because the timer callback is placed in the task queue and runs only when the call stack is empty.
Timers vs I/O Callbacks (High‑Level)
Broadly, callbacks come from two main categories:
Timers:
setTimeout,setIntervalcallbacks.I/O callbacks: File system, network, database operations, and other async I/O whose callbacks are managed by the OS or
libuv.
In simple terms:
Timers are about “run after X milliseconds” (or as soon as possible if 0).
I/O callbacks are about “run when the file is read” or “when the HTTP request finished”.
The event loop schedules these in different phases, but at our conceptual level you can think of them as two queues of work that the event loop services in an orderly way.
Role of the Event Loop in Scalability
The event loop is key to Node.js “scalability” because:
It keeps the main thread busy instead of idling while waiting for I/O.
Each incoming request can be handled with a small amount of JS work, then offloaded to the OS; the server can then move to the next request.
This single‑thread + event loop + async I/O model uses far less memory than spawning a full thread per request (like in many traditional back‑ends).
So for I/O‑bound workloads (APIs, file reads, network calls), Node.js scales well to many concurrent connections without heavy thread overhead.
Simple Diagram Ideas You Can Use
If you want to illustrate this in your blog, here are two easy diagrams you can sketch:
1. Call Stack + Task Queue + Event Loop Flow
Draw a JS Engine box with:
A call stack (stack of function frames).
A heap for objects.
Around it, draw a circle representing the event loop.
Attach a task queue (queue of callbacks) pointing into the call stack.
Add arrows:
“Async op starts → goes to OS / libuv”.
“When done → callback added to task queue”.
“Event loop → checks queue → pushes callback to call stack”.
This matches the common browser/Node loop visualization but tailored for Node.
2. Event Loop Execution Cycle (High‑Level)
Sketch a circle divided into 5–6 segments:
Run all synchronous code (current JS block).
Check microtask queue (Promises,
process.nextTick) and run until empty.Check timers (
setTimeout,setInterval) that are due.Check I/O callbacks (file, network, etc.).
Process
setImmediate‑style callbacks.Handle close events (e.g., socket closed).
Then loop back to the first step.
Label each segment and add a small arrow looping back to the top, showing that the event loop runs continuously.
Wrapping Up
The Node.js event loop is essentially a smart task manager that keeps your single‑threaded server responsive by offloading I/O to the OS, queuing callbacks, and running them in an orderly way. It turns the “weakness” of being single‑threaded into a strength for I/O‑heavy workloads, making Node.js a natural fit for scalable APIs, real‑time services, and fast‑moving web backends.
If you liked this conceptual overview and want, the next step can be exploring how timers, microtasks, and setImmediate interact in the same loop—without losing performance along the way.